Hiding Progress Bar Steps in Drupal 8 Webform
Mar 26, 2018
Check Out Some Recent Posts:
- React Leaflet Custom Map Icons
Nov 19, 2019
- Use 'const', Even When You Think You Shouldn't
Jan 23, 2019
- An Easy Way To Practice With Twig Without Drupal
Mar 28, 2018
- Hiding Progress Bar Steps in Drupal 8 Webform
Mar 26, 2018
I was recently working on a client site in Drupal 8 that involved a multi-step form. The client is an insurance agency and wanted to have a quote form that users can fill out to start the process of getting a quote for insurance. Since the agency covers multiple kinds of insurance, this meant that the form needed to handle multiple types of insurance. To create this, I used the Webform module. I thought about doing multiple forms for simplicity, but realized that a single user might want to get a quote for more than one kind of insurance and asking them to fill out the same information multiple times would be frustrating and a negative user experience.
The default progress bar is a series of circles with the number of the step on them and the label for the step underneath.

Using built-in conditional logic I am able to hide pages or reveal pages as the user progresses based on their choice of Auto or Homeowner's. The problem is that hitting "next" would mean the user sees all of the steps but doesn't use them. While I recognize there is the possibility of user confusion for the progress bar to be changing throughout the process, I think there would be more confusion for the user to see steps showing that they've been visited when the user hasn't actually visited them.
So my goal was to remove the steps that aren't going to be used based on the user's selection.
I'll say right now that this solution works and is pretty effective but not as flexible as I would prefer. It requires some template and css changes every time a new type of insurance is added or if the order of the pages were to change. But since a form like this isn't one that will change that dramatically very often, I'm ok with those limitations. Also, a lot of the idea for how to approach to this came from Wes Ruvacalba who has been helping me out with solving some of the tougher problems I've run into.
So to make this work we had to accomplish a few things:
- Give each page marker a unique ID
- Find a way to identify which types of insurance are checked
- Use the insurance types to trigger hiding or showing the relevant markers on the timeline.
- Style a new progress bar that will allow for the dynamic adding and removing of these steps.
Uniquely Identifying Page Markers
Step 1 was to give each page marker a unique identifier that would allow us to do something with them later. This was taken care of in the Twig template for the form. In my case, the form is called "Get A Quote" so we went to the file: /modules/webform/templates/webform-progress-tracker.html.twig and copied it into my mytheme/templates/webform directory (if you don't have that directory in your theme files, just create it). Then we renamed it: webform-progress-tracker--get-a-quote.html.twig to ensure that it would be used for this specific form. If you're not familiar with template hints when you're theme building check out this article about setting up your local dev environment. Looking at the default template file there already is a unique identifier for each page set as a value in a span: <span class="progress-marker">{{ index + 1 }}</span>. When you look at the default progress bar, you can see this showing up as a number in a circle:

So I basically want this number to be used in adding a CSS class to each marker to designate its step in the line. Fortunately, it's really easy to just copy the Twig code and reuse it for creating a CSS class.
I'm going to assume you know some about how to create stuff in Twig so I'm not going to explain everything here. To add it to a class on the marker, first let's look at the whole template:
{{ attach_library('webform/webform.progress.tracker') }}
<ul class="webform-progress-tracker progress-tracker progress-tracker--center">
  {% for index, title in progress %}
  {%
    set classes = [
      'progress-step',
      index < current_index ? 'is-complete',
      index == current_index ? 'is-active',
    ]
  %}
  <li{{ attributes.setAttribute('class', '').addClass(classes) }}>
    <span class="progress-marker">{{ index + 1 }}</span>
    {% if progress|length < max_pages %}
      <span class="progress-text">
        <div class="progress-title">{{ title }}</div>
      </span>
    {% endif %}
  </li>
  {% endfor %}
</ul>
You can see that this code creates an unordered list with a for loop inside that creates the list items for each of the markers. In the initial list item, the CSS classes are being added with .addClass(classes). This is using the "classes" variable that's defined above and adds multiple values of classes. Currently, it's adding a class to define if the item has been completed already or if it's the currently active step. We want to add in one that just says which number step it is so that we have a uniquely identified class for each marker. To do this, we'll add a new line to the "classes" variable. My first guess was to have index + 1 joined up with my text, in this case "webform" but it didn't work. So I instead created a new variable above the "classes" variable to take care of the math part: {% set pagenumber = index + 1 %} then I referenced that variable inside the "classes" variable to add the class: 'webform_page' ~ pagenumber,.
{{ attach_library('webform/webform.progress.tracker') }}
<ul class="webform-progress-tracker progress-tracker progress-tracker--center">
  {% for index, title in progress %}
  {% set pagenumber = index + 1 %}
  {%
    set classes = [
      'progress-step',
      index < current_index ? 'is-complete',
      index == current_index ? 'is-active',
      'webform_page' ~ pagenumber,
    ]
  %}
  <li{{ attributes.setAttribute('class', '').addClass(classes) }}>
    <span class="progress-marker">{{ index + 1 }}</span>
    {% if progress|length < max_pages %}
      <span class="progress-text">
        <div class="progress-title">{{ title }}</div>
      </span>
    {% endif %}
  </li>
  {% endfor %}
</ul>
One important note. If you look, the "classes" variable and my new "pagenumber" variable are declared inside the for loop. This is really important because if it wasn't, it wouldn't be able to know which number to put for "index" or if the marker indicates a step that has been completed or is the current one.
So now, we have a CSS class that's being added to each marker that looks like this: "webform_page1", "webform_page2", etc. The next step is figuring out which type(s) of insurance are checked at the beginning of the form to make sure those steps are shown.
Identifying Which Types of Insurance are Checked
To figure this step out, we need to work in the .theme file. In your myThemeName.theme file go down to the bottom and add:
function myThemeName_form_alter(&$form, \Drupal\Core\Form\FormStateInterface $form_state, $form_id) {
}
Make sure to replace "myThemeName" with the name of your own theme.
So this calls the function hook_form_alter which allows us to work with the data inside the form. The first thing that we want to do is check to make sure we're working with the right form. We can get the form ID by looking at the HTML for the form. Inside the form tag it says: <form id="webform-submission-get-a-quote-add-form". There's a lot more info, but just look for the ID in there and copy the name down.
Important note: copy the name but replace the dashes with underscores! So the final name should look like this: webform_submission_get_a_quote_add_form.
So we set an if statement to check to make sure we're only working with the "get a quote" form:
if ($form_id == 'webform_submission_get_a_quote_add_form') {
}
Next, we need to look at the form itself and see what checkbox set we want to use to base it off and get the machine name for it. For mine it's "whatkind_of_insurance_are_you_looking_for".
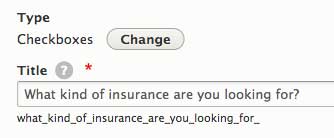
So we want to get this value and assign it to a variable that we'll call $checkbox: getValue('what_kind_of_insurance_are_you_looking_for_');.
Next we want to verify that $checkbox contains an array. This is because even though it's an array the way we set it up, at some point when the page loads this doesn't contain an array so to get rid of the errors that show up, we have this if statement:
if (is_array($checkbox)) {
}
So now we get to the part that isn't flexible. There's probably a way around this, but for now, it works. we set up multiple if statements for each of the types of insurance and used them to add a class to the form tag.
if (in_array("Auto",$checkbox)) {
    $form['#attributes']['class'][]='webform_insurance_selector_auto';
  }
  if (in_array("Home or Rental",$checkbox)) {
    $form['#attributes']['class'][]='webform_insurance_selector_home';
  }
We use "in_array" to check to see if the value has been added $checkbox then if it is, we add a new class to the form based on the one that's being checked.
So if this is working correctly, when I move on to the second page of my form my array tag will have one or both of those classes added to it. When you go to check this, make sure to flush your caches before you check to make sure that your new function is being recognized.
Triggering The Timeline Markers
So now we have a class on the form tag that specifies which of the checkboxes are tagged and we have each marker marked uniquely. So we just need to say "when the Auto class is on the form tag, show markers 2 and 3", or something like that. Wes came up with the nicely simple way to do this with CSS thanks to descendant selectors. Basically, if there are two classes on a CSS declaration, the first one needs to be on a parent item and the second on a child item inside of that parent for it to be applied. So first I tell all of the pages that are affected by the logic to hide: .webform_page2, .webform_page3, .webform_page4, .webform_page5 { display: none; }. (You might think this is what I meant with the descendant selectors, but no, because each class name is separated by a comma, it's just looking at each of them as distinct from the others. It's the same as writing each class on its own with the diplay:none. This just saves space.) Then I add the descendant selector declarations that take the classes that are added to the form tag as the parent selector and the page numbers as the child selectors and set the styles to allow them to be visible:
.webform_insurance_selector_auto .webform_page2,
.webform_insurance_selector_auto .webform_page3 {
  display: block;
}

.webform_insurance_selector_home .webform_page4,
.webform_insurance_selector_home .webform_page5 {
  display: block;
}
So now if everything went smoothly, after you save your files, clear your caches and move forward past the first page of the form, only the markers that are associated with the checkbox(es) you checked should show up!
Styling The New Markers
The final step is to make the markers look a little different because of the fact that we're hiding steps along the way so the original numbers don't work anymore. It'd be confusing for the user to see they're going from page 2 to page 6. So we need to get rid of the number and style it differently to look nice with just the title of the page as the primary element. Since this post is mostly about how I got rid of the extra markers, I won't go into this but here's the final Twig template:
{{ attach_library('webform/webform.progress.tracker') }}

<ul class="webform-progress-tracker progress-tracker progress-tracker--center hia-quote-progress-bar">
  {% for index, title in progress %}
  {% set pagenumber = index + 1 %}
  {% set zindex = index * 10 %}
  {%
    set classes = [
      'hia-quote-progress-step',
      index < current_index ? 'hia-quote-progress-step-is-complete',
      index == current_index ? 'hia-quote-progress-step-is-active',
      index == max_pages ? 'hia-quote-progress-step-is-last',
      'webform_page' ~ pagenumber,
    ]
  %}
  {% if loop.last %}
  <li{{ attributes.setAttribute('class', '').addClass(classes) }} style="z-index: -{{ zindex }}">
    {#<span class="hia-quote-progress-marker">{{ index + 1 }}</span>#}
    {% if progress|length < max_pages %}
      <span class="hia-quote-progress-text uk-visible@s">
        <div class="hia-quote-progress-title">{{ title }}</div>
      </span>
    {% endif %}
  </li>
  {% else %}


  <li{{ attributes.setAttribute('class', '').addClass(classes) }} style="z-index: -{{ zindex }}">
    {#<span class="hia-quote-progress-marker">{{ index + 1 }}</span>#}
    {% if progress|length < max_pages %}
      <span class="hia-quote-progress-text uk-visible@s">
        <div class="hia-quote-progress-title">{{ title }}</div>
        <div class="hia-quote-progress-marker"></div>
      </span>
    {% endif %}
  </li>
  {% endif %}
  {% endfor %}
</ul>
To see the progress bar design I came up with, I put the design into a pen on Codepen where you can see how it all comes together.
I hope this all made sense to you. If you have any questions, feel free to leave a comment or contact me via Twitter (@rlahoda). Thanks for reading!
Back to the blogCheck Out Some Recent Posts:
- React Leaflet Custom Map Icons
Nov 19, 2019
- Use 'const', Even When You Think You Shouldn't
Jan 23, 2019
- An Easy Way To Practice With Twig Without Drupal
Mar 28, 2018
- Hiding Progress Bar Steps in Drupal 8 Webform
Mar 26, 2018